 |
| January 15, 2013 | Volume 09 Issue 02 |
Designfax weekly eMagazine
Archives
Partners
Manufacturing Center
Product Spotlight
Modern Applications News
Metalworking Ideas For
Today's Job Shops
Tooling and Production
Strategies for large
metalworking plants
Engineer's Toolbox:
The importance of the insertion quill when installing coiled spring pins
By Christie L. Jones, Market Development Manager, SPIROL International Corp.
When installing Coiled Spring Pins, it is important that the installation tool, often called a "quill," is large enough to cover the entire end of the Coiled Pin. The quill should be sized such that it pushes on all five coils simultaneously throughout the entire installation process. Otherwise, the pin will be difficult -- if not impossible -- to properly install into the assembly.
If the quill is too small, the inner coils will push through the center of the pin creating a "telescoping" effect and push out the back end of the Coiled Pin. Sometimes, users refer to this as the pin "unwrapping."
It is important to note that it is impossible for pins to "telescope" or "unwrap" if the proper insertion quill is used. A byproduct of pushing on the inner coils is elevated insertion forces, and if the quill is too small, the Coiled Pin will not be able to flex to take on the diameter of the hole since the quill will be lodged in the ID of the pin.
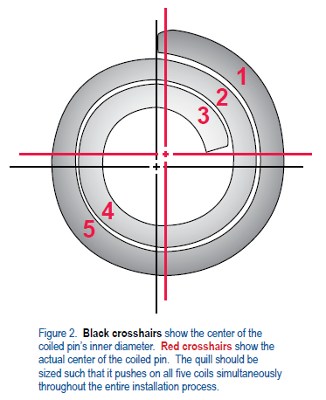
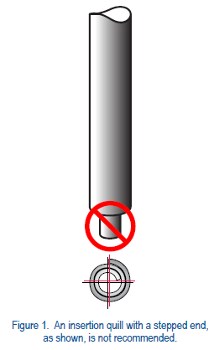
Occasionally, a company will develop an insertion quill that has a stepped end that is intended to fit into the ID of the Coiled Pin to "help align the pin with the hole" (Figure 1). There are two problems with this scenario. The first problem is that the actual center of the Coiled Pin is not in the center of the ID (Figure 2). Therefore, the effect of sticking something into the ID of the pin is that it will actually knock the pin off-center from the hole!
The second problem is that the nib at the end of the installation tool may prevent the pin from collapsing as it is inserted into the hole. This can significantly raise insertion forces; and if the nib is large enough, prevent full insertion of the pin into the hole. In some cases, the quill can break off and get stuck in the ID of the pin, causing downtime on the assembly line.
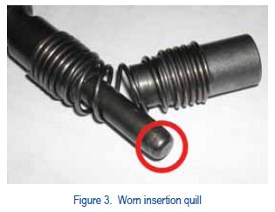
Another common issue is when a company continues to use a worn insertion quill. Over time, the end of the insertion quill will break down. Notice on Figure 3 the tip of the tool, circled in red, is worn and the edges are smoothed over. At some point, the end of the quill will be too small such that it will not cover the entire end of the Coiled Pin. As described above, the quill will press on the inner coils of the pin, and insertion issues will arise.
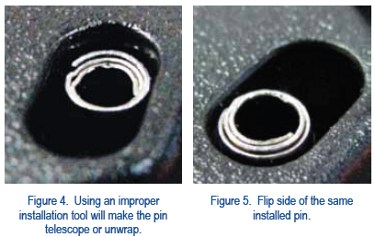
The following example exhibits what happened to a manufacturer of ejector clip assemblies when the installation tool their subcontractor used was not large enough to cover the entire end of the Coiled Pin. The result was that the insertion tool (quill) ended up pushing on the inner coils of the Coiled Pin, and made the pin "telescope" or "unwrap." This dramatically increased the insertion force, and at times, prevented the pin from being fully installed into the assembly.
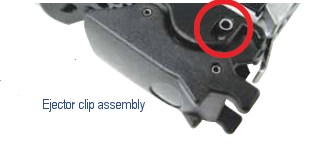
Figure 4 shows a view from the top of the pin -- the side that the installation tool pressed on during insertion. One can clearly see that the inner coils are pushed in and away from the outer coil. Markings are also visible on the inner coil where the insertion quill hit the material as it entered the ID of the Coiled Pin.
Figure 5 is a view from the back side of the same installed pin. This clearly displays the result of pushing on the inner coils; the coils end up telescoping or pushing out of the back end of the pin.
For anyone experiencing these installation issues, the solution is an easy fix: Simply change the installation tool. However, it is best to avoid this situation all together.
Generally speaking, if the Coiled Pin is going to be installed flush or above flush, it is recommended that the insertion quill have a minimum diameter equal to the nominal diameter of the pin. If the pin is going to be installed sub-flush, it is recommended that the insertion quill have a diameter greater than or equal to the diameter of the chamfer at the very end of the pin. Considering that insertion quills are wear items, assemblers should periodically check the very end of the quill to make sure that it is always flat and square and that it meets the above diameter criteria.
SPIROL Engineering will review your particular application and recommend the specific insertion tool to meet your requirements. Email info@spirol.com.
Want more information? Click below.
Published January 2013
Rate this article
View our terms of use and privacy policy
